Mountain Vargath

The Mountain Vargath (Spirit / Instinct) is an aggressive faction based on pushing as a team led by one of the strongest support summoners in the game. 

The faction focuses on high life units that can be buffed in strength by the summoner’s ability, and a variety of movement tactics and tricks to surprise the opponent.
This is not a simple or straightforward faction, but a faction filled with utility cards and events that are very powerful but only with the right setup.  Playing Mountain Vargath requires pushing and pressuring the opponent while preparing multiple setups for all of the potential big Mountain Vargath plays, which is how in most games they get the upper hand.

Mountain Vargath is the perfect faction to those that want to play aggressive but want to have a lot of options, tactics and maneuvers to consider and think about.
Sunderved
A support summoner, Sunderved is essential for the Mountain Vargath to function, as the units are tough but lack the strength to be able to pressure the opponent unless they are supported by him. Adding +3 Strength in total per turn (+1 per attack) is very powerful and is the core of Mountain Vargath strength in combination with their high life units.

Unlike other factions, the Mountain Vargath do not have a Plan B. If Sunderved is forced out of the picture, it’s a downward spiral from there for the faction. However, because his support ability has a range of 2 and works through gates, it is possible for Sunderved to support the team safely most of the game, even when he is low on life.

If he is under potential pressure, his Epic Event Stronghold can allow him to easily retreat to a safe position.

It's important for most of the game to minimize the chances for the opponent to damage Sunderved, he has 4 strength and especially with Battle Leader may be tempting to use, but you should only do so if it’s reliably safe, often with the afore-mentioned Stronghold as a fallback.
Wolfsbane Brute
One of the two core commons of the Mountain Vargath. Brutes generally lead the push. A key aspect of the Brute is that it is a great position stealer. It slowly advances to the position the Mountain Vargath want to take, generally the front of a gate, by moving the enemy units away.
You can move the brute next to the space you want to take and then if the opponent fails to kill it, move away any unit in the way to take that spot. This makes them exceptionally good to lead the push with their high health and the threat to take any spot with relative ease.

In combination with Glory Callers, which force them 1 space, they can take spots by surprise and also threaten champions and summoners to be moved into a bad position, as their ability makes no discrimination.
You should try to have one Brute on the field at all times leading the pushes, but multiples of them are also good and a team of Brutes can do some nasty tricks with their ability, especially combined with Glory Callers.
Shale Slinger
The other core common of the deck, a lot of the damage of the Mountain Vargath will come from Shale Slingers, more often than not protected by the other tough units in the deck.
Because they are ranged, it is very easy for them to be both in Sunderved’s area of support and still able to target enemy units, even when Sunderved is playing extra safe. Having 1 or 2 Shale Slingers out at all times is very common play for this faction.
Slingers also allow the Mountain Vargath to not worry about finding flanks of attack and be able to easily focus fire. A Brute with two Slingers behind can all attack the same spot, making it good versus high life targets and gates.
A common trick with the Slinger, is using a friendly melee unit to destroy a unit that is protecting the enemy summoner, then use the Slinger to target the summoner (no longer protected). This is a big part of how this faction threatens summoners.
In general thanks to Slingers, the Mountain Vargath are extremely good at focus fire which is why it is often very hard to defend from their pushes, as the common strategy of reducing flanks is not as viable versus the Mountain Vargath.
Slagborn Fighter
Mostly a utility common that should be used for its Forceful Attack ability.
This ability is the major way you have to threaten opponent summoners and champions. Your gates, thanks to Slagborn Fighters in combination with the multiple tricks, are a threat that makes it very unsafe in many positions. Champions, especially melee ones, may be scary to play against this faction for that reason.
However this is still a utility unit, and your main attacking force should be composed of Wolfsbane Brutes and Shale Slingers.
Yes, with the help of Sunderved this can be your cheapest damage as a 3 strength melee common that only costs 1. So sometimes you just want damage and then the fighter is a very cheap and efficient way to get that damage on board.
Glory Caller
Glory Callers are both the support and damage soakers of the team. Their main role is their one shot ability to force a unit one space, giving you a virtual extra movement, allowing the unit to reach further or just in general help a faction that is highly based on formations and positioning to achieve their goals.
After that trick is used, you are left with a 4 life body that can be used to protect spots and cover Shale Slingers, and with Sunderved’s support they can do some damage if needed. 
All in all you should think of the Glory Caller like an event that forces a unit one space, and then leaves you with a cheap body to be used as a damage soaker.
Ramming Advance
Generally the Mountain Vargath are a slow but hard to stop force … except when they decide it’s time to be fast thanks to Ramming Advance. This event gives the faction some of its strongest starts against factions that want time. Often rushing the game next to the opponent, skipping the pushing part of the game into the trading blows which is something Mountain Vargath always want to do.

Other than skipping the push, if the push is already done, it can allow the Mountain Vargath to have some assassination potential, especially combined with Slagborn Fighters.

Finally, Ramming Advance is your ticket back into action after you play Stronghold. So this is a common one-two punch of hitting, Stronghold, and then coming right back in with a Ramming Advance.

However, in games where the action is focused on the middle of the field or your push in the front lines is already established, it is generally better to discard this for magic if it doesn’t seem the opponent will open his summoner for potential assassination. 

To take advantage of this event you don’t need to wait for a perfect turn where you get to charge with 3 units, often just being able to charge with a single unit like a fighter that pushes the opponent summoner for other units to hit, may be enough to get value. But if you need magic, this is an event that may be too situational to find its time.
Battle Leader
The true power of this card is generally the extra attack. A 5 strength extra attack is a powerful ability for an event. Especially when playing defensively or having an attrition war in the middle of the board, Battle Leader is one of the key ways to get advantage or comeback, being both an economic and tempo advantage.
However, especially against some decks, it is hard to make use of without exposing your summoner unless you also have Marshal Forces or Stronghold ready to go. And then you can see how sometimes it requires too many things to go right to be useful.
In brief, this is a very powerful event that when it finds its moment is one of the key ways the faction gains an edge, but clogging your hand to try to find that moment in a game that is not leading in that direction may not be worth it and it is then better to discard for other cards.
Stronghold
The Epic Event of Mountain Vargath is tricky to use and requires setup but is very powerful, and arguably the strongest economic card in the deck. One of the big ways to gain an edge in summoner wars is to not allow the opponent to attack your cards, and Stronghold can take 3 targets that can be careless in their positioning and put them outside of harm’s way. That is a very powerful effect for just 1 card.
However, after that tricky part happens and you save your units, the Mountain Vargath now need to restart their march back into enemy territory and for this aggressive faction, that can be a major downturn. 
Ramming advance is a way to cheat this, but what most games will do is position gates in such a way that you can use Stronghold, save your units and be ready to quickly rejoin and push again. So this is an event that requires players to both think about execution and set up the whole board state. Learning where to place gates in a way that your Stronghold use(s) saves your units but doesn't halt your pressure, is a very important skill. Sadly that is not something this guide can easily help with as each matchup and game is different and different gate positions are optimal in different situations, but it is something to have in mind when playing the Mountain Vargath. Don’t take the easy route of discarding Stronghold if you don’t know what to do with it, it’s a very powerful event, arguably the strongest you have, if you manage to use it properly to maximize the Mountain Vargath strength, then every game you should play at least one copy but most likely both of this event.
Marshal Forces
Lastly the most versatile event of the faction.  While other events are powerful but situational, Marshal Forces is potentially powerful and very versatile. Probably the event you will end up  using the most. While it may seem like an event to save to find an optimal use, thanks to the other 3 situational events of the faction it is often better to use this one more readily, even if it’s just a marginal scenario. With that said, in general it is better to play it than discard it.

Here are some of the main uses of Marshal Forces:
- The most common use is to pressure the opponent’s summoner, by killing it’s blocker, using Marshal Forces to bring in a unit there and attacking the opponent’s summoner. 
- Allowing Sunderved to attack, kill a unit and then immediately cover that open flank (sometimes even allowing a new attack from that position).
-Saving a unit by attacking with it from an otherwise unsafe spot, and then moving it next to the safer Sunderved position. This is a useful trick with the champions that often have more utility than health (yes, it works on champions!)
Varn
The most versatile champion in the faction is good in all situations. For a faction so based on formations, having a champion that can manipulate the formations for free is incredibly valuable. The fact that the ability can be used in any phase makes it even more so.
The range will feel short a lot of the time but that is reasonable. 
Some, but not all of Form Up’s uses:
- Free a summoning spot to summon a new unit
- Bring a unit forward for extra range
- Rearrange a formation
- Get a unit to safety after it is threatened
- Protect another unit like your summoner after it is attacked and going to counter. Example -  counterattack with Sunderved, killing his attacker and then use Form Up to bring a Glory Caller to the now open spot.
- Probably the major threat is the ability for Varn to kill a blocker and then bring a friendly unit to that space to attack the unit that was being protected.

Varn allows you to do a lot of interesting tricks when pushing but is also good on defense. Varn is probably good in most situations, the only important thing is that he is ultimately a support champion which means often you need to summon other units the turn you summon Varn. So generally if you want to play him, you will need to get to 7 or 8 magic so that turn you can summon Varn and a couple of commons to set up his tricks and best threat potential.
Note that Varn’s ability also works on champions and it has some very interesting tricks to use in combination with Quen and Torodin, and as expensive as this may sound, the Mountain Vargath can sometimes manage to get to such scenarios.
Quen
Quen gives the Mountain Vargath three tools that complement their strategy. A high strength ranged attack (4 with Sunderved’s support) and an ability to punish tight formations, which is something that the faction struggles with in some matchup, as it can limit the ability of Wolfsbane Brutes to move units around. 
Quen is also a good siege unit not only for being able to punish tight formations but also because she can target opponent gates and do splash damage in the process.
Torodin
Torodin and Quen somewhat overlap with similar uses, both are good against commons,  especially those in tight formations and can help put pressure on players that are playing defensively. And that is fine, since this is a situation that is common for the Mountain Vargath to face.
Torodin is probably the better of both options, and less reliant on working as a team, as any other unit in the faction. Often Torodin can run to do his own thing, but only if you can really afford it. While other decks may struggle to get to such a high cost unit, the Mountain Vargath high life units often survive enough to give time to save up magic without giving up on pressure and board presence.
Torodin is also very good at threatening low life summoners with his climb ability, and some of the abilities of Mountain Vargath like Form Up and Ramming Advance.
Torodin, as most other high cost champions is good to give you an early window to burn your deck for magic, knowing that as long as he is still coming in the deck, you will have a way to spend that magic, and as all other champions of this type, he’s great to have against factions that summon a lot of commons and give you a lot of magic. Having a way to spend that magic is good, especially when it is to summon a champion that is particularly good against commons, as Torodin is.
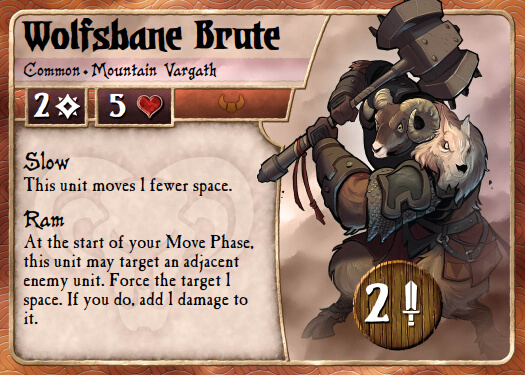
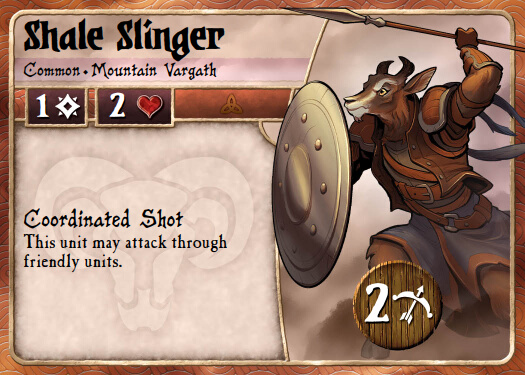
Start the game with the mentality to push and make the enemy territory yours. Use Wolfsbane Brutes to set up the advance backed with Shale Slinger support and Sunderved always in the back granting Commander from safety. That is the starting point of all Mountain Vargath play.
In the meantime you will be doing movement and positioning setups to threaten the opponent with all of the utility you have.

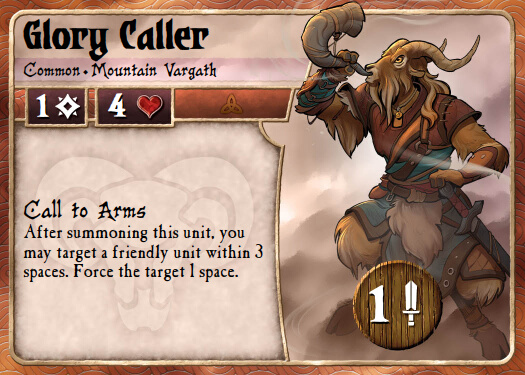
Mountain Vargath event usage is tricky. Their event suite is very powerful but yet all very situational or demanding setup, so sometimes it is easy to clog your hand with events and not find their perfect situation. A way to mitigate this is to summon extra commons as to have presence on the board even when nothing is summoned next turn. Shale Slingers are the best for this as they can often wait in safety to be used, but also Wolfsbane Brutes are always welcome in multiples on your front lines.

Realizing when it’s time to let go of an event or keep trying to set up the situation it needs is always going to be a tough decision.

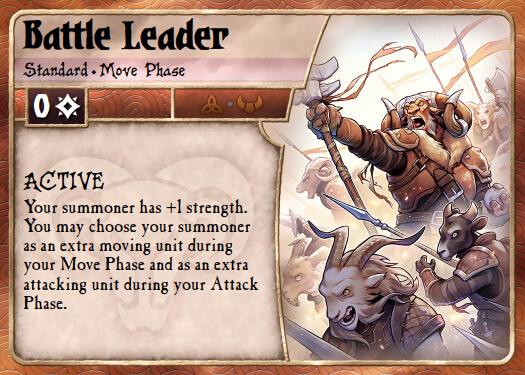
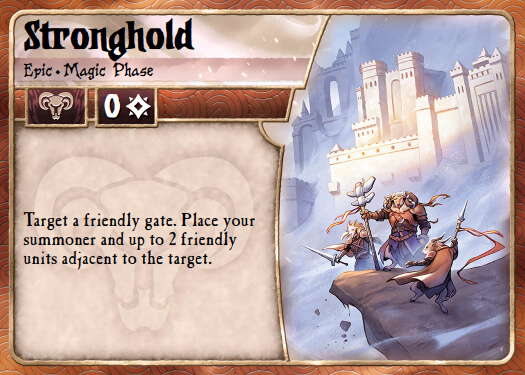
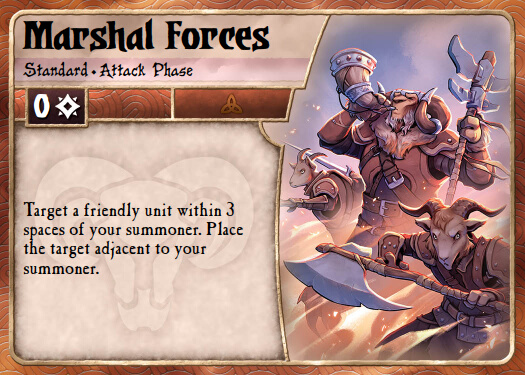
It will often be tempting to save a lot of events in hand trying to find their perfect time, especially because they all can combine very well, you can use Ramming Advance to get into the opponent units, attack with Battle Leader, and then use Marshal Forces or Stronghold to protect Sunderved. However, balancing your hand space for events is a balancing act and you may end up with all events and no units if you are not careful.

It is important to remember that while the core of the Mountain Vargath is very simple - Brutes on the front - Slingers in the back and Sunderved close enough to buff them, it’s their vast variety of tricks and powerful events with the right setup that allow the Mountain Vargath to get the edge. Learning how to maximize each of their tricks, when to squeeze the most juice out  of their powerful events, learning when it’s time to setup and when it’s time to let go, are the skills most required to master the Mountain Vargath.
Copyrights for the Summoner Wars logo and art belong to Plaid Hat Games, used herein with their express permission.
Search for a card...
of