Polar Dwarves

The Polar Dwarves (Water/Logic) focus on creating a fortress of structures that they can manipulate in their favor.

A versatile deck with low mobility, the Polar Dwarves excel in both ranged and melee combat, adept at both attacking and defending.

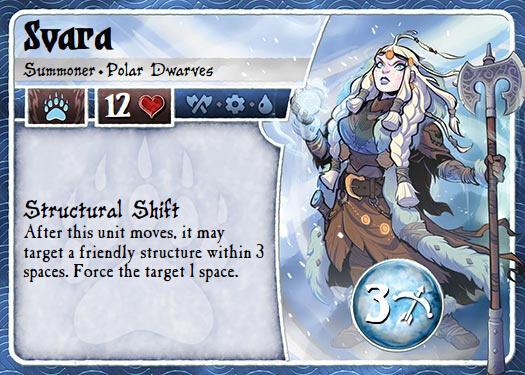
Their summoner, Svara, enjoys constructing numerous structures to empower her units and events, enabling her to besiege the opponent’s forces effectively. Svara boasts a robust ranged game, which can compel opponents to push into the fortress. In such cases, Svara can swiftly manipulate the position of structures to create an unfavorable situation for the opponent.

When facing opponents with superior mobility or economic tools, Svara may find it necessary to push forward. Fortunately, she possesses the tools to do so by advancing the fortress and engaging in a slow but potent melee game.

The polar dwarves need to compensate their lack of mobility with their ability to move their sturdy structures, most of them gates, which allows the polar dwarves to summon units into enemy territory.

Svara can strategically use the structures to control the opponent's space, limiting their safe movement and placing both factions on equal footing in terms of mobility. This situation allows Svara to gain an advantage with more efficient units, boosted by structures or upgrades.
Svara
Structural Shift has many uses, too many to list in fact without requiring its own guide, but it is obviously the number one key to playing Svara well.  It allows her to move structures into better positions and it puts enemy offensive units in bad spots. Often units use enemy gates to protect their advance, that is a key element of Summoner Wars strategy, and Svara cheats that entire system. Trying to do that often means Svara will just move the gate, removing the protection of that unit.  This is the reason it is so hard to attack Svara.

Gates can be moved into offensive positions as well. One of the easiest, strong plays is moving the initial 10 life gate into a position that is uncomfortable for the opponent.
It also makes Parapets incredibly unfair, works with Ice Ram and pushes Ice Golems faster than they should normally be allowed to move.  It is also often just used to "cheat" by creating turns with an extra movement (as an Ice Golem and Svara both move in the same movement).

And of course structures are moved to support the Frost Mages and reposition Parapets.
Frost Mage
Frost Mage is one of the two core units of Svara’s arsenal. They need a lot of setup, but if properly supported they just cannot be out-valued as they can be a relatively easy 3 or 4 ranged attack strength on 4 life for only 1 magic.

Svara’s core gameplay relies on building a fortress of structures and besieging the opponent with Frost Mages, thus forcing the opponent to act.
Ice Golem
Ice Golem is the second core unit for Svara. Svara requires structures for almost everything and therefore Ice Golems are necessary for nearly all of her plans. In that sense they are extremely versatile as they help any plan or tactic you want to employ. On defense they can save Svara movements because they can be built on your side wherever they are needed, and on offense they bring other units into a forward position.

They are held back by Slow but Glacial Shift and Structural Shift both help compensate for that and even outside of that, kiting them is not really possible as they can summon units next to themselves to reach ranged attackers.

Ice Golems are a very safe investment for Svara because they are always useful, summoning all 4 of them is not an uncommon occurrence in games for Polar Dwarves.
Bear Cavalry
Bear Cavalry are the main Polar Dwarves melee unit, necessary to stop aggression, and necessary to have as a threat that can come out of your Ice Golems.

Bear Cavalry make it very hard to attack your Frost Mages at melee range for an enemy common.  This is because the Frost Mages are usually next to a gate and if the Frost Mage dies, a Bear Cavalry can replace it and be immediately ready to Trample the melee unit that killed the Frost Mage.

They fill a Svara weakness, in that having many gates (especially in the form of Ice Golems) can be nice, but only if you have something threatening to come out of them.  The Bear Cavalry fills this role of “nasty threat” that can pop out of your gates.  In the proper situations, a Bear Cavalry is the best way to deal with enemy melee commons.  Even if they don’t come out Trampling when first summoned, they have enough life that they are likely to survive, and then can Trample whatever common was used to attack them at melee range.

They are also excellent in offensive pushes as they can Trample through blocking enemy commons to unexpectedly arrive next to the opposing summoner.
  
Bear Cavalry are also the best Target of Frost axes, Bear Cavalry + Frost axe is the main way you have to threat enemy Champions and Summoners.
Ice Smith
Every deck needs a way to deal high amounts of focused damage in order to deal with high life enemy targets and for that task Svara has Ice Smiths.  They are very economically efficient. You are spending 1 magic to give Ice Golems a “virtual” +2 attack strength and Bear Cavalry a "virtual" +3 attack strength.  That is definitely great value for 1 magic.

However, the movement cost is not trivial at all and one of the main reasons they can be so hard to use well. Every one of Svara’s movements is incredibly precious.

With that said, don’t be afraid to summon Ice Smiths whenever you have a movement to spare, as once you get past the movement cost their efficiency is great.

Bear Cavalry are the best targets, however Ice Golems can be Ice Repaired and enhanced with Ollag. In addition to that there are many tricks available to Ice Golems that Bear Cavalry don’t have access to, so don’t be afraid to give Frost Axe to Ice Golems, even if in general Bear Cavalry gets more value out of them.

Outside of their Frost Axe ability, Ice Smiths are still useful units, a 0 cost 2/2 with no abilities is a very playable unit in Summoner Wars.  But the first time you move them, you boost them, and then they “threaten” to give Frost Axe to something, which will usually require some kind of response from the opponent.

Don’t be afraid to summon Ice Smiths just for their combat capabilities though.
Ice Ram
Ice Ram is a deceptively strong Epic Event.
One event to do a wound and force a target is a very reasonable trade in many situations.
So don’t be afraid to use Ice Ram even if you are only getting one trigger.

However with Svara's ability, Ice Golems and Glacial Shift, you can do the effect multiple times in the same turn. Remember you can Ram your own Ice golems to move them further before moving those golems, giving you extra range if you are willing to damage them.
To say the least, the value she can get from Ice Ram is really off the charts.

Trying to setup at least one big Ice Ram turn is a big part of the gameplay of Polar dwarves. This turn can be game shifting and the kind of turn that put the Polar Dwarves in a favorable position.

Glacial Shift
It would be impossible to not talk about Glacial Shift immediately after Ice Ram as  both events are strongly connected. That is the big combo of Svara, but also, do not be afraid to use Glacial Shift on its own.  In the right board state, Glacial Shift on its own can still provide great value.  Shifting the board position, putting pressure on the opponent or just allowing your Ice Golems to all reach your opponent’s units, can more than justify this event in many cases.

Don’t misunderstand, you should still try to combo Glacial Shift with Ice Ram for really powerful turns, and probably around 50% of the time you will do exactly that.  Just don’t be blind to the possibility of using it even outside of Ice Ram turns.
Ice Repair
One of the big incentives of trying to set the peace of the game as Polar Dwarves is Ice Repair. If you can choose the trades, you can easily put yourself in a situation where your opponent cannot focus fire down Parapets and Ice Golems fast enough, and then you can Ice Repair for 4+ damage overall.  That is an absurdly powerful effect. Don’t be afraid to just leave a wounded Ice Golem far from danger, waiting for that Ice Repair to come.

While setting up the perfect Ice Repair turn is all great, just healing two wounds from an Ice Golem is still decent value, so don’t be afraid of doing that if it could mean the Ice Golem survives even one extra attack.
Parapet
Parapet is another very strong event.  If it couldn’t be moved it would only be okay, but being able to move it makes it feel almost unfair.  It is a very rare game where you don’t want to play both Parapets.
The most common use is to put it in front of an enemy gate, and then besiege that gate, forcing the opponent to act without any really good answers.
Nadiana
If you want to win the ranged game, Nadiana + Parapet is very hard to downright impossible to out-value from a distance.
Jarmund
Jarmund is often the favorite Polar Dwarves champion and very consistently summoned.  He is strong in both offense and defense, and he is particularly nasty when you are in a pushing mode and have your opponent on the ropes, surrounded with structures in forward positions.
Ollag
Usually the least favored Svara champion, Ollag needs a lot to be going for him in order to be worth it. His ability is “meh” and he doesn’t really have great stats to compensate.  However, he can be good if you manage to summon him early in the game and then get value for all of your Ice Golems, especially if you give Frost Axes to those 2/6 Ice Golems, then he can feel unfair. But other than very early in the game, it is usually preferable to just summon Bear Cavalry.
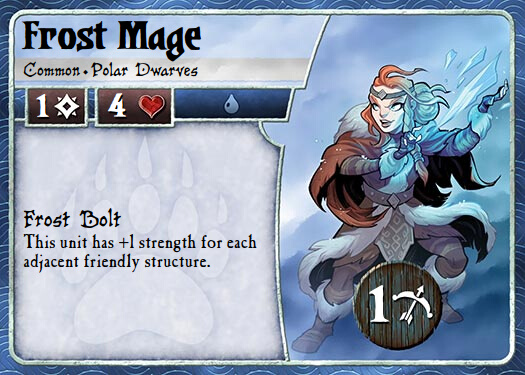
The Polar Dwarves usual start is to summon a Frost Mage, surround it with structures, and then besiege the opponent’s gates or units.  If no targets are within range, then slowly move the structures forward to attack.  It is almost impossible to trade efficiently against this because a Frost Mage surrounded by structures is a 4/4 for 1 magic.

This is their general setup, and then from there they can react to whatever the opponent does.

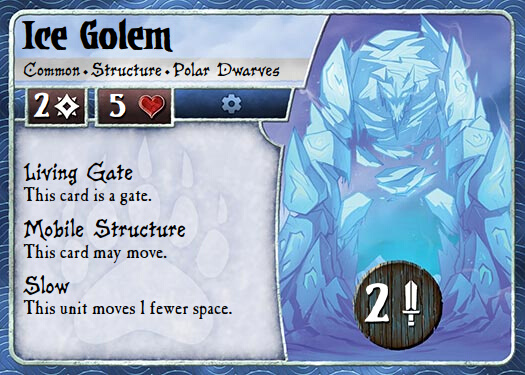
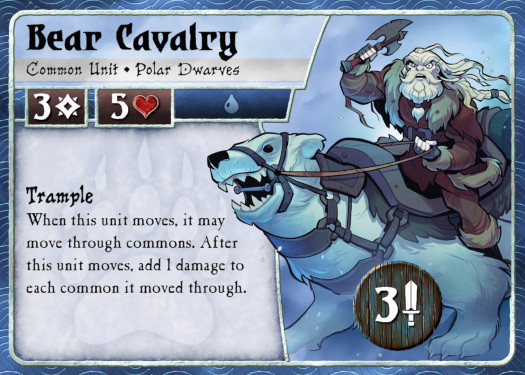
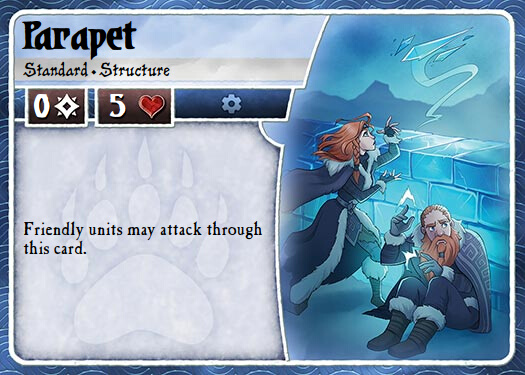
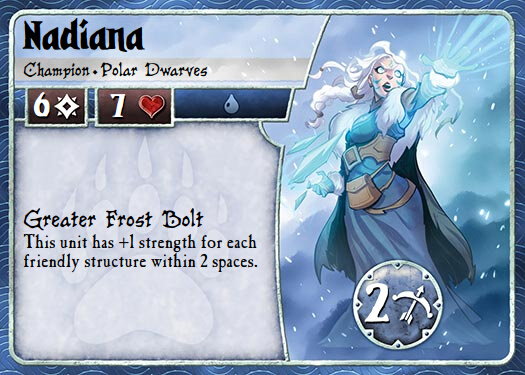
To support this ranged game, Svara has tools like Parapets and Nadiana.  If the opponent assaults aggressively, Svara can re-arrange her structures to her benefit.  A common move of hers is to force a gate, opening a path for her to shoot the enemy unit that was blocking the gate. Svara can also use Ice Golems and Bear Cavalry to efficiently fight in melee.

Despite her love for structures, you may find that you rarely build regular gates and that your structures tend to be Ice Golems and Parapets.

In general, when you are in the lead, you don’t want to let the opponent recover, especially if your lead is that of  tempo and board position.  But even if it’s just an economic lead, be wary that many decks can build combos that can out-value Svara economically in the long run.

It is not good to let the opponent sit back and do whatever they want in most cases when playing the Polar Dwarves.  Against some decks, while you may not be in a rush and can play the ranged game to keep things going, in reality you still need to put pressure on as fast as possible.  Push to control game tempo and flow.
 
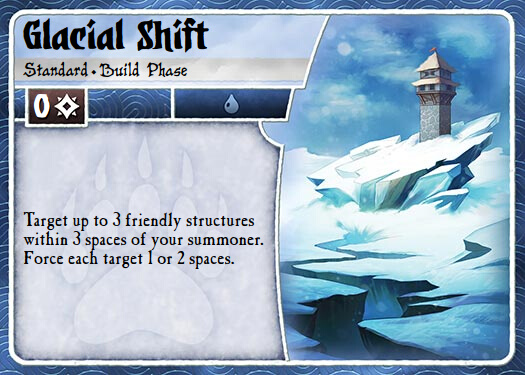
Svara can quickly switch to an offensive game plan thanks to Glacial Shift and before the opponent knows it you can have an army of Ice Golems, from which Bear Cavalry can pop out, directly into enemy territory.

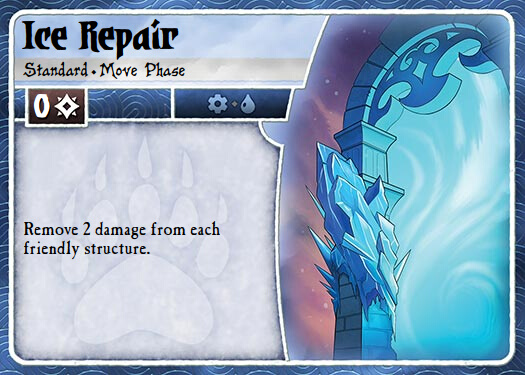
Polar Dwarves can choose the shape of the fight. Even forcing the opponent to spread the damage between structures instead of focus fire on units, and that ‘s when Polar Dwarves can produce one of the most powerful effects, Ice Repair.  Svara often wins by forcing the damage of the opponent to be spread out between structures like Ice Golems and Parapets, and then Ice Repairing for 6+ damage.  

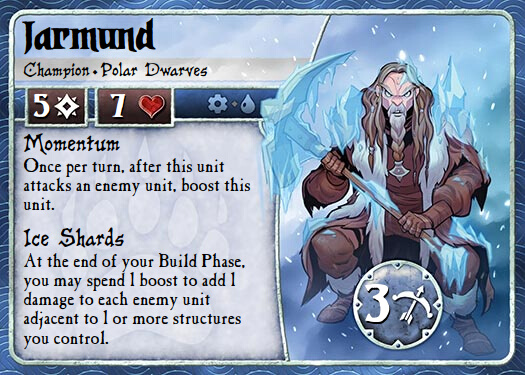
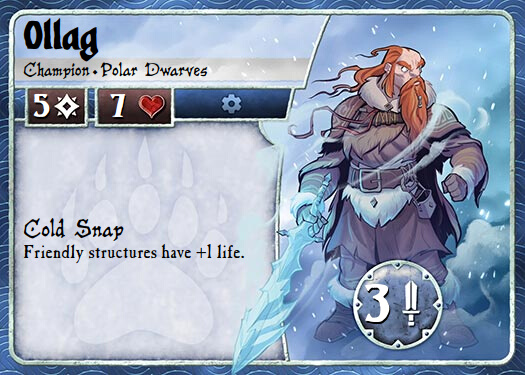
Two Polar Dwarf champions can make pushes really strong, and it is suggested to summon at least one of them every game to make the push truly overwhelming.

Polar Dwarves, require patience and good timing, deciding when to poke with Frost mages or when to push is probably the hardest decision you will have to make playing them.
Copyrights for the Summoner Wars logo and art belong to Plaid Hat Games, used herein with their express permission.
Search for a card...
of