Shimmersea Fae

The Shimmersea Fae (Light/Water) is an aggressive faction built around tempo and precise, well-timed pushes. Its primary goal is to force the opponent into close-quarters skirmishes. The faction thrives when both sides entangle their gates close to each other, allowing the Fae to seize control by stealing gate spots, limiting the opponent’s options, and pressuring their summoner through persistent pokes.

Games of the Shimmersea Fae follow three stages:
The Build-Up
The faction’s effectiveness hinges on preparation. Early in the game (typically the first 1 to 3 turns), focus on assembling key resources: a gate, High Tide, a Scout, and ideally, a Champion. Use Scouts and Oracles to poke at range while positioning your summoner to be ready for a push. This early setup is critical for enabling your faction’s signature tempo play.
  1. The Advance
    Once prepared, move your summoner forward and establish an offensive gate, ideally supported by High Tide. This pivotal move sets the stage for the faction’s signature pressure. 
  2. The Clog
    With an offensive gate in place, your next goal is to establish a second gate strategically while clogging the battlefield with Scouts and Tidebreakers. This denies the opponent valuable options and forces attritional skirmishes. Your summoner plays a key role here: leveraging its abilities to sustain the fight while opportunistically poking at the enemy summoner.
  3. At this stage, the game diverges into two main win conditions for the Shimmersea Fae:
    • Leveraging their clogging potential to dominate the attrition war.
    • Using a mix of pokes and tricks to assassinate the opponent’s summoner.

No faction values gates as highly as the Shimmersea Fae. Playing all your gates every game should be a top priority, even in suboptimal positions ,to avoid discarding them. Gates are central to the Fae’s tricks and strategies, creating the “clogged” game states where the faction excels. These conditions force both sides to contend with limited attack opportunities, a challenge the Fae mitigate with their numerous tricks to perform 3 attacks even in clogged situations.

When the Shimmersea Fae goes second, opponents may attempt to preemptively push into your territory, forcing you into a defensive posture and nullifying the Spearhead event. While this can disrupt your plans, it often makes it easier for the Fae to play to play on their own terms. Even without Spearhead, you can adapt by establishing a gate in the far far left, and sneaking a Champion there to be able to repeteadly use the Spearhead.

Nymira Shoalsong
While obviously a combat summoner, involving Nymira in battle can be tricky and requires careful timing. The most important factor is ensuring she is healthy when her Spearhead event comes into play. While you can attack diagonally “safely” against many decks, it still requires a decent amount of health to pull off effectively. The faction's power heavily relies on the antics she can execute when Spearhead is active. Of course, every attack counts, as she can deal 5 damage per attack phase (6 with Spearhead) and is the only high-damage card in the entire deck. Because the deck depends so much on her for high damage, it is important to prioritize her health over attacking low-health targets that other units in the deck can handle.

Her defense relies on safe diagonal attacks with Spearhead, the champion Lyra to cover her after an attack, and the Scout common, which can summon a unit after an attack.
An example sequence is: moving in with Nymira, placing a gate next to her, attacking with Nymira to kill a unit, then attacking with a Scout to summon a Tidebreaker from the new gate, and positioning that Tidebreaker in front of Nymira.

The deck is filled with tricks like this, designed not only to protect Nymira but also to enable many of the Shimmersea Fae’s most powerful plays. Learning these tactics, internalizing their potential, and staying aware of which options are available each turn is critical to mastering the faction. I’ll highlight some of these tricks in greater detail when discussing the rest of the cards.


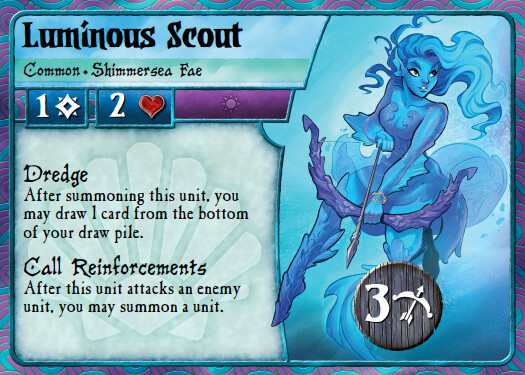
Luminous Scout
Scouts are the engine behind most of the faction’s tricks, making them essential to your strategy. It’s crucial to aim for summoning all four Scouts in every game, or even more, thanks to Swarm returning them to your hand. While it’s occasionally acceptable to discard a Scout in the first turn to maintain hand flow, they’re too integral to your plays to discard lightly.

One reason gates are so crucial to the faction is their synergy with Scouts. After building a Gate, you can summon a unit from it during the attack phase to seize key positions, shield your Scout or summoner, or perform a variety of tactical moves.

The Scout’s utility also eliminates the need for the Shimmersea Fae to rely on flanking for multiple attacks. By attacking with a Scout, summoning a unit from a nearby Gate, and then attacking with the summoned unit, you can maximize your attack count each turn, all while keeping your Scout protected.. 

In addition to being central to the faction’s tricks, Scouts provide tempo advantage by drawing a card from the bottom of the deck. This not only helps you find the pieces you need but also enables you to cycle back your two champions, Lyra and Enara, through their Descend ability, ensuring they return to the battlefield when needed.

Tidebreaker
The Tidebreaker is your primary combat unit and the most efficient stat-wise in the faction. You’ll want to summon at least three per game, often more, thanks to Swarm. When in doubt, summon Tidebreakers. Their Rush ability synergizes perfectly with Scouts, enabling many of your faction’s tricks. Even without setting up specific plays, their 1-cost 3/3 stat line is consistently strong.
To maximize their potential, however, it’s important to have at least one Champion in play. Without a Champion, the faction can struggle to deliver meaningful damage each round, limiting the Tidebreaker’s overall effectiveness.
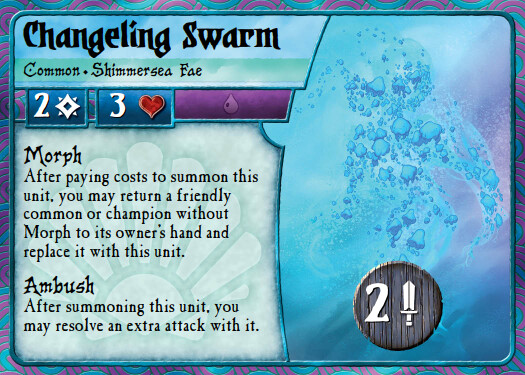
Changeling Swarm
Unlike Scouts and Tidebreakers, Changeling Swarms should be summoned with caution. They can be costly and lack stat efficiency, so it’s essential to leverage their abilities to justify their expense.
Swarm is a strong play in specific scenarios, such as:
  • - Using its Summon Attack to eliminate a 1- or 2-health unit, allowing you to secure a kill while maintaining three strong attacks.
  • - Opening a space during the movement phase to enable a critical play.
  • - Returning a damaged Tidebreaker or Scout to your hand for reuse.
  • - Summoning it alongside a Scout to enable a third attack in the same turn.

In every case, it’s vital to utilize the "Summon Attack", without it, play them is almost never worth the investment.  However, in these scenarios, the Swarm provides access to several tricks and threats that enhance the Shimmersea Fae's pressure and assassination potential.


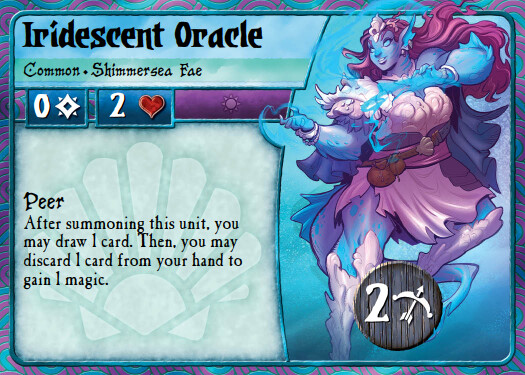
Iridescent Oracle
Although Oracle is a 0-cost unit, it should be used sparingly. Its 2-ranged attack is often not what the faction wants, but like Changeling Swarm, Oracle has specific, situational uses.
- During the build-up phase, Oracle can accelerate your tempo by helping you draw the cards needed to prepare for a push while poking at enemies with minimal risk
- It can serve as a cheap way to clog critical spots on the battlefield
- A useful tactic is to attack with a Scout, summon Oracle in front of the Scout, and then attack with the Oracle again. This not only protects the Scout but also allows for two ranged attacks along the same flank
- If you plan to summon a Changeling Swarm next to a Gate, it’s often better to first summon an Oracle and then place the Changeling on top of it

Despite these few uses, Oracle is one of the safest cards to discard if you need magic and are unsure what to part with. While it has niche applications, it’s not essential to the faction’s core strategies.

High Tide
This epic event defines much of what the faction seeks to achieve. High Tide enables the faction’s strategy early in the game and acts as a valuable movement trick for closing out games in the late stages.
In most cases, it is more impactful early on, allowing you to reposition your 10 life Gate into a more aggressive position and integrate it into the action. Often, the best way to transition into the faction’s push phase is through the use of High Tide, making it a near-automatic play unless the game has already become heavily clogged. Once it has fulfilled its role, High Tide can be safely discarded. However, holding onto a copy as a high-cost movement option can sometimes secure a decisive late-game victory.
Spearhead
Spearhead is one of the key ways to gain a significant edge with Nymira, and keeping it active for multiple turns is critical to the faction’s success. This is why controlling champions on opponent's side of the board is essential. Spearhead is so influential that it’s practically a win condition for the Shimmersea Fae, showcasing the faction at its most dangerous by enabling Nymira’s diagonal attacks.
To maintain Spearhead, you generally need two champions on the board, typically the Deepwater Sisters. If only one champion is in play and it dies, the Spearhead effect ends, so it’s safer to have both sisters in play.
Despite its importance, don’t hesitate to discard the first copy if you need the magic or the hand to flow. You generally want at least one Spearhead per game, and while a second copy can be helpful, it’s not mandatory.
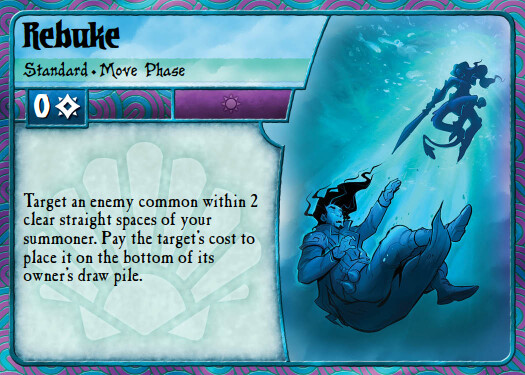
Rebuke
Rebuke is a powerful but highly situational trick and very expensive, that demands careful use. Its requirement to target "straight spaces" significantly limits its flexibility, making it difficult to find use cases.

As a general rule, it’s best to discard the first copy to maintain hand flow and only keep the second copy for potential late-game situations where it could help finish off an opponent’s summoner. While there may be niche moments where Rebuke can shine, it’s typically safer to treat it as a situational late-game option rather than an essential tool.
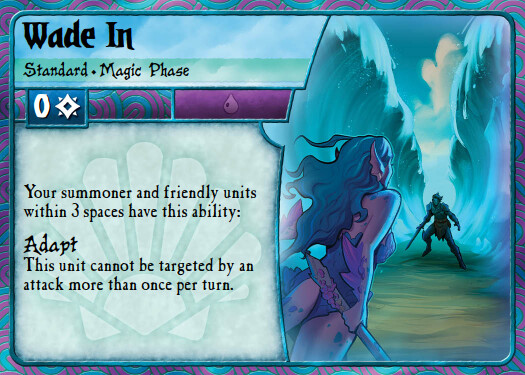
Wade In
Wade In is another situational event that only works well in very specific setups, so it's only worth playing when those opportunities present themselves naturally.  Trying to force setups to make Wade In effective is usually not worth the effort.

One of the scenarios where this card is usefull is when you try to apply sudden pressure with Nymira. For example, you might move her forward to use Ebb and eliminate a unit, attack another and set up for building an offensive Gate on the following turn. In that situation Nymira may end overexposed and Wade In provides survivability.  
When you draw Wade In,  evaluate the board and determine if you can set up a favorable scenario that turn. If not, it’s often better to discard it.


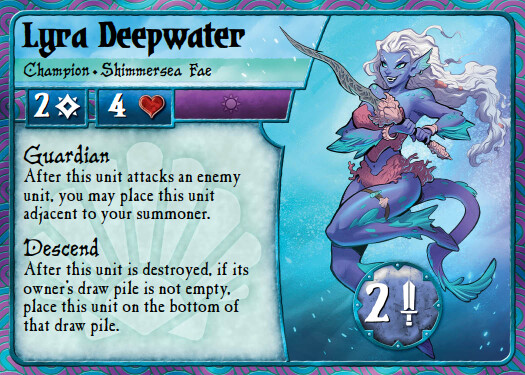
Lyra Deepwater
The first of the Deepwater twins, Lyra serves as your primary tank and a cornerstone of the faction's strategy. Her role is to absorb damage, triggering her Descend ability while shielding your other key units. Lyra is a must-play card because of her ability to soak damage, enhance your Tidebreakers, protect Nymira, and maintain your Spearhead event.
Lyra’s playstyle is straightforward. After Nymira attacks and eliminates a unit, follow up with Lyra, positioning her to shield Nymira from retaliation
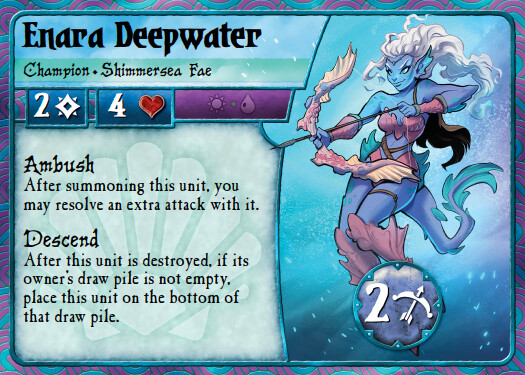
Enara Deepwater
The second twin, Enara, is also a must play unit, for similar reasons than her Sister. While she is ranged, she is the one you most want to see played. Summoning her just for her Ambush attack (not intendending to use her regular attack) is perfectly fine, as most of her value comes from her health.

Enara still is a good option to deal damage through blockers, especially when supported by a Scout.
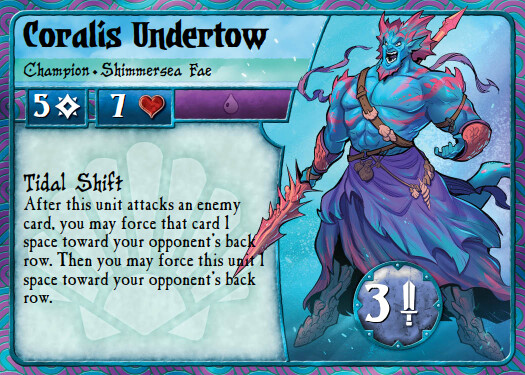
Coralis Undertow
Coralis is primarily useful as a high-cost option, particularly when facing decks that provide you with extra magic. You can even return and resummon Coralis alongside a Changeling Swarm. As a champion, Coralis also helps maintain synergy with the faction's mechanics.
Its ability to force cards is situational and can be difficult to use effectively. However, when you're pushing aggressively, this ability can disrupt your opponent's positioning and open up opportunities to snowball an advantage.
Ultimately, Coralis’s greatest strength lies in being a high-health, expensive unit, filling a niche that the deck otherwise lacks.

The Shimmersea Fae is a highly tempo-based faction. Unlike others, it often sacrifices economy for positional advantages. Early in the game, you should draw aggressively, but as the game progresses, shift to a more conservative approach. You need to set up your tricks while ensuring you have enough cards in your deck to keep the Deepwater twins returning. Mastering this transition is a key skill for playing the faction effectively.

When discarding, prioritize keeping:
All Gates.
Everything else is situational and disposable.

Although Shimmersea Fae is an aggressive faction, much of the strategy lies in managing your deck and hand. If you don’t have the right cards, take slower, more patient turns to set up stronger future plays.


Copyrights for the Summoner Wars logo and art belong to Plaid Hat Games, used herein with their express permission.
Search for a card...
of